Showing posts with label Cards. Show all posts

April 24, 2012

A Card with a Girly Touch

Another friend and one of my new running partners celebrated her birthday last week. Seems as though this is a popular time of year for birthdays amongst my family and friends! We had the pleasure of dining at their place this weekend, so I of course whipped up a card just for her.

I love girly cards, which this one totally is. I started with a script stamped background and layered on paper strips in floral and spring colours, along with a strip of washi tape. That was topped off with a layered flower embellishment and a stamped greeting banner. Altogether it says “girly” to me. And with my little man being the focus of my scrappy adventures these days, I love it.
Thanks for looking J

April 17, 2012

A Flower + Splatter Birthday Card

One of my besties celebrated her birthday last week. I wrote a longer post about her last year and the sentiments are the same. Adding in of course that's she a strong, determined, kick-ass chick who's lost 90 pounds in just over a year. Seriously awesome-sauce given she did that all on her own by changing her approach to eating and working out at home while looking out for five lovely kiddos. I'll also add in mention of how lucky I am my boy is about to become one of those five lovely kiddos and the blessing it is to know he's in great hands. All that to say, she deserved nothing less than a handmade card to celebrate her special day:


To make this, I started with a blank white background and splattered it with some Mister Huey inks. I then layered on a yellow cardstock punched border strip misted with the same inks, a dotted patterned paper strip and some chevron washi tape. On top of that I layered a large flower with a handcut flower circle from the same dotted patterned paper with a smaller yellow felt flower and finally a brad. Some stamped pennant strips for the greeting and it was a card fit for a queen. Or at the very least one of my best friends.

Happy Birthday Sandy!

April 5, 2012

Four Butterfly Birthdays

I told you on Monday I had a few crafty cards to share this week - and on a lovely sunny day, butterfly birthdays seem fitting to share. Between March 24 & March 30, four lovely ladies in my life celebrated their birthday. I sat down to make all four cards one evening. Once the first one was finished:


I really liked the way it looked, so I decided to use the same design (a design of my own this time!) for all four. I did change up the papers, colours and sentiment wording on each so that each card was unique - just like the lovely ladies receiving them:


To make these, I started by splattering the backgrounds of the cards with Mister Huey`s spray inks ... love, love, love those. They mist, they splatter, they splot, they cover. They're awesome...but I digress. Once the ink dried, I layered a punched scalloped circle with three strips of washi tape ... which I also love, love, love. I have a bunch of different patterns of washi tape now and have six or seven more on order from Freckled Fawn (via the Paperie). But I digress again. After that, a couple of punched butterflies with sparkly gems popped up finished the paperwork. Finally, I added a few word stickers and stamped birthday to make the sentiment. Simple, but sweet. Or sweet, but simple.

Each card is the same design, but made special with choice of colours and wording. I hope the ladies liked them! Happy birthdays Jennifer, Katie, Victoria, and Hunter.


February 21, 2012

Pay It Forward: The Reveal

Earlier this month I posted about Pay It Forward 2012. The concept was simple, the first five people to comment on a friend's facebook status about paying it forward would receive something handmade by her in exchange for reposting the status on their page and giving something handmade to the first five people who commented on their status, and so on from there.

In my previous post I just gave a sneak-peak into my handmade goodies, as the recipients had yet to recieve them and I wanted them to have some element of surprise. I mailed them shortly thereafter and know at least three of the five recipients have their treats in hand, which means they likely all do and it's likely safe to share.

I decided to use my existing craft and scrapbook supplies to make up five card and gift tag sets. Each set included three cards and two gift tags that the recipients can use to give to family or friends. How's that for a little pay it forward in a pay it forward! Here's a look at what I whipped up in a long-nap afternoon:

A mixed set of a thank you card, a hello car and a happy day card,
with two thank you tags - I can totally see these hanging over a bottle of wine!

Two sets of thank you cards and tags

Another mixed card set and two friends tags

And a similar mixed card set, only with a best wishes instead of a congrats card
and two friends tags.

Once they were finished, I packaged them up in envelopes and then randomly wrote names/addresses on them so I didn't have to pick who got what sets! I loved them all, so I couldn't pick and choose :)

If you're so inspired, maybe you can make something for someone special this week. Whether a sweet treat, a casserole for supper, a card, a handsewn apron, a knitted hat, or a simple cup of coffee, I'm sure they'll love it. And honestly, there's no better feeling than giving something handmade.

February 14, 2012

Happy Valentine's Day

When you are in love you can’t fall asleep because reality is finally better than your dreams.
~ Dr. Seuss.

Given all the Dr. Seuss books we're reading and the lack of sleep we tend to be getting these days, this seemed like the perfect quote to celebrate Valentine's Day at the Ryan's. While I'll be keeping it low-key today with plenty of cuddles with the little man all day and a late post-HP's bedtime supper and glass of vino with my hubby, we did make sure to exchange love notes with HP's little friends last week.  


One of the many fabulous mommies I know hosted a playdate at her place last week where she had the most delightful spread of pink lemonade, red berries, and pink frosted treats. HP enjoyed the strawberries the most, while momma 's sweet tooth prevailed and the sweet iced short breads were tops for her. We also traded valentine's amongst the kidlets. There were cards and photos and word art with hearts and Winnie the Pooh for valentines HP. For his little friends I made these sweet little valentines:


I used pre-made felt hearts and birdies, mounted them on white cardstock along with a few strips of valentine-themed tape. Letter stickers personalized the notes and a greeting was stamped inside. Quick and easy, but special greetings for special little people.

And of course, if you're so inclined to share the love for my little man today you can head on over to the Bellies and Bundles facebook page and click like on his photo. He's in the V-day contest over there and, though biased, I think he's about the cutest little cupid there is:


I hope you all have a love-filled and peaceful day.
Happy Valentine's Day.


December 28, 2011

An Old Christmas Card

It's the same every year. Starting in early December my house is filled with Christmas cards from family and friends near and far. I love checking the mail, reading the greetings, seeing the family photos, and hearing about how everyone's year has been. It is awesome. That is until I have to decide what to do with them once the New Year has begun. Sure, some cards are special and will end up in my pretty tied-up pile that comes out with the decorations each year, but the bulk of them need to go somewhere else and I simply hate for that to be in the trash can.

If you're like me and wondering what to do to with all those cards, consider reusing and recycling. I've rounded up a few fun ideas that should work for almost every crafty skill level:

Take all those photo cards from friends and fam and create a photo collage to be enjoyed year-round. Try framing a collage like this one made by MotherHuddle.com or creating a scrapbook page like Ali Edwards often does. I'm planning on doing this for this year, as well as saving some of my favourites to add in as embellishments on other holiday scrapbook pages.

photo collage from MotherHuddle.com

collage scrapbook page from AliEdwards.com
If you have kiddies (big or small) in the house, try creating your own advent calendar that uses bits and pieces of old cards behind the doors, like this one on the ever-crafty MarthaStewart.com website:


Of course you can also use bits and pieces of those holiday cards to whip up gift tags to use next year, handmade ornaments such as this intricate 3D star, or this awesome little gift bag. I would love to get a little treat in one of these beauties, wouldn't you?

as seen on wikihow.com
The options for kid friendly crafts are endless too. You could sit them down with child-friendly scissors, glue or tape a guidelines for making coasters, bookmarks, tree ornaments, art pages, holiday magnets, puzzles, and more.

Or, if you consider yourself the non-crafty type, you can always donate those holiday cards to a program like the St. Jude's Ranch, which recycles old cards of all occasions into new cards through one of their programs. The old cards are made into new cards by removing the front and attaching a new back. The benefits are "two-fold in that customers can buy “green” holiday cards for use and the youth involved in the Ranch program receive payment for their work and learn the benefits and importance of “going green”. 

As you take down those card wreaths, garlands and mantle displays this year, take the time to give those old cards new life rather than just tossing them in the trash.

Do you have another fun way to use up old cards?

September 8, 2011

Happy 50th Birthday Cards

Over the long weekend, we celebrated two 50th birthdays of two wonderful ladies in our family. Before heading out of town, I made two cards for them. As you can see I kept them similar, but still made them special for the recipient:

the same, but different

On this one, the circle cut out revealed the 50 from the inside of the card...
 
inside

This one kept everything outside

Another birthday card coming your way tomorrow!

August 31, 2011

Cream to my Coffee Card

I swear this is the last of the posts related to the husband's birthday :) Here's the card I made for him, inspired by a poke around Pinterest where I spied this poster and a poke around my supplies where I spied this underused stamp and put two and two together to create this:


All papers, stickers, twine and inks from The Paperie.
Stamp was picked up in Halifax ages ago.

August 8, 2011

Wedding Wishes

I had the privilege of attending a beautiful wedding in Bonavista on the weekend. I love weddings - planning them, Reading about them, attending them. Of course, that's primarily because it's awesome to watch to people in love become husband and wife and to celebrate in their joy. It's also because weddings are such a reflection of personal style, and well, I'm into that kinda thing.

When I attend weddings, I try to make a card that is inspired by the wedding invitation. People spend so much time picking colours and choosing their designs, I think it adds something special to the card to incorporate that somehow. So, here's the card I created for this wedding and you can see the wedding invite and envelope beneath it:


As you can see, I used the colours and general design as the base of the card. I had a circle flower stamp set from Hero Arts that I used to mimic the look of the flower/pinwheels and clustered them together in the same way. I used a plain old hole puncher and backed the holes with paper in the wedding colours on the bottom for added dimension and then used the sparkly ribbon and gemstones in the circles for added bling. Tis a wedding after all! I finished it all up with a Happy (on outside) Together (on inside) stamp using one of my favourite sentiment stamp sets from Stampin' Up (note: I'm not sure they carry this one any more, but they have other similar ones that I love on pages 166-167 of the 2011-2012 catalogue).

So nice and bright and cheery. I really liked the way it turned out and hope the bride does too!

May 10, 2011

Cards for Moms

Needless to say that with a new babe, time for crafting and card-marking is limited if non-existent, but with Mother's Day this past weekend, I did want to create something special for my mom. I saw this card over on Traveling Mama's blog and used that as my inspiration (not coming up with the original design/layout cut down on the time needed to create the card and time is a valued commodity these days, right up there with sleep!).  This was my version of her lovely design:


And of course, I couldn't forgot my wonderful Mother-in-Law on Mother's Day as well. Fortunately, I had this card on hand. I made this sweet card at a recent Stampin' Up class and it was perfect for Mother's Day.


I hope everyone enjoyed a lovely mother's day weekend.

March 25, 2011

Birthdays

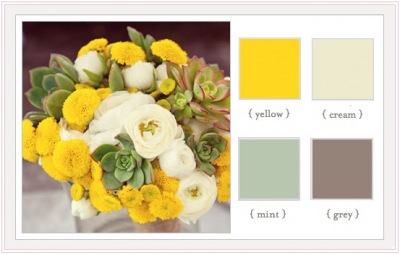
With a few upcoming birthdays and *hopefully* a birth day of my own, I made a few birthday cards yesterday afternoon. The Paperie posted an awesome colour board on their blog this week, so I used that as my starting point for two girlie cards.  


I love using up my scraps of paper when making cards - and since they`re stashed in baggies by colour it was a breeze to pick out a few strips in the muted green, yellow and cream colours. I punched a bunch of those strips all at once using a border punch and layered them on two card bases I cut from gray card stock.

For the first card, I broke out my new Stampin' Up Chic Boutique set and white embossed the sewing form and sentiment. It still felt like it needed something else so I added a little vintage-style lace, a textured grey button and mint green thread. I love the way the button and lace fit with the 'sewing' theme.


For the next one, I added the same lace, but used a horizontal ruffle to contract against the vertical ruffle feel of the layered paper. I then added a layered flower/button combo and rub-on sentiment. I also love the way this one turned out ... not sure which I like better...hmmm.


Hopefully the March birthday girls will enjoy them!